Posts

Showing posts from 2011

Disaster Recovery in Router s

This information is here primarily for my reference at customer sites; for some odd reason, I seem to be recovering IOS images through ROMMON quite a bit lately. These are the minimum fields to get this going through TFTP rather than XModem. Hopefully you find this beneficial as well! rommon 1 > IP_ADDRESS=192.168.1.100 rommon 2 > IP_SUBNET_MASK=255.255.255.0 rommon 3 > DEFAULT_GATEWAY=192.168.1.1 rommon 4 > TFTP_SERVER=192.168.1.50 rommon 5 > TFTP_FILE=c2600-adventerprisek9-mz.124-5a.bin rommon 6 > tftpdnld            (this command kicks off the tftp download)
Completely Clearing a Cisco Switch...The Easy Way!

Clearing out a Cisco switch configuration is always a pain because VLANs are kept in a seperate file from the startup-config (NVRAM). There's two ways to clear a switch back to the factory defaults - the easy way and the REALLY easy way: The easy way - Switch# write erase Switch# delete flash:vlan.dat Switch# reload

OSPF Neighbor Exchange Process

Image
Using the Hello protocol, there is a series of exchanges that routers go through in order to establish relationship when OSPF is initilized. I’d like to go through some of this steps using examples from a lab environment, and watching some debug output in the process. To start, here’s the setup for the exercise: Figure 1: A simple topology Dynamips .net Config: # OSPF Neighbor Exchange Lab Topology autostart = False ghostios = true sparsemem = true [localhost]    [[7200]]         image = \Program Files\Dynamips\images\C7200-JK.BIN         # On Linux / Unix use forward slashes:         # image = /opt/7200-images/c7200-jk9o3s-mz.124-7a.image         npe = npe-400         ram = 96         ghostios = True         [[ROUTER A]]         Fa0/0 = B Fa0/0         model = 7200         console = 2001     [[router B]]         model = 7200         console = 2002 Down State Figure 2: Router A – interface added to OSPF When the router is enabled on the LAN, it starts in the Down state and sta

OSPF LSA's

Type LSA Functionality 1 Router Defines the state and cost of the link to the neighbor and IP prefix associated with the point-to-point link. 2 Network Defines the number of routers attached to the segment. It gives information about the subnet mask on that segment. 3 Summary network Describes the destination outside an area but within the OSPF domain. The summary for one area is flooded into other areas, and vice versa. 4 Summary ASBR Describes the information about the ASBR. In a single area, there will be no summary Type 4 LSA. 5 External Defines routes to destination external to OSPF domain. Every subnet is represented by a single external LSA. 6 [*] Group membership 7 NSSA Defines routes to an external destination, but in a separate LSA format known as Type 7. 8 [*] Unuse

Non-Routable (Private) IP

RFC 1597 provides for a group of Internet Networks that will never be assigned. Furthermore, these addresses will not route through the Internet. This makes them the proper choice for use in your home or company Intranet. We recommend non-routable IP for most networks. These IP addresses have specifically been set aside to use when it isn’t necessary (or desirable) for anyone on the Internet to be able to instantly navigate to your computer. It is especially useful to the DSL and Cable Modem users who have multiple computers connected to a single proxy server, firewall or router. These non-routable IP addresses also provide additional security on the “Internal” side of your network. Typically a firewall, Cable Modem or DSL router will provide Network Address Translation (NAT) to translate the these nonroutable address to a real Internet routable IP address. Reserved IP addresses for private networks 10.0.0.0 – 10.255.255.255                     /8 172.16.0.0 – 172.31.255.255        

IP Subnet Zero

When you work with classical subnetting, you always have to eliminate the subnets that contain either all zeros or all ones in the subnet portion. Hence, you always used the formula 2 N  2 to define the number of valid subnets created. However, Cisco devices can use those subnets, as long as the command ip subnet-zero is in the configuration. This command is on by default in Cisco IOS Software Release 12.0 and later; if it was turned off for some reason, however, you can re-enable it by using the following command: Router(config)#ip subnet-zero  Now you can use the formula 2 N  rather than 2 N  - 2. 2 N Number of total subnets created   2 N  2 Number of valid subnets created No longer needed because you have the ip subnet-zero command enabled 2 H Number of total hosts per subnet   2 H  2 Number of valid hosts per subnet  

ROUTER CONFIGURATION PARTITIONING

If you have to troubleshoot routers with long configurations, you're probably as fed up with the slow response of the  show running-config  command as I am. Unfortunately, there's not much you can do; the running configuration is reverse-engineered from various memory variables every time you ask for it and that process simply takes time if you've configured many parameters. IOS release 12.2(33)SRB has introduced a fantastic feature:  router configuration partitioning . The early seeds of this idea are already present in mainstream IOS releases. For example, you can  display the configuration of a single interface , all class-maps or all policy-maps. The configuration partitioning gives you the ability to display access-lists, route-maps, static routes, router configurations ... PE-A# show running-config partition ?   access-list All access-list configurations   class-map All class-map configurations   common All remaining unregistered configura

BGP Confederation

Image
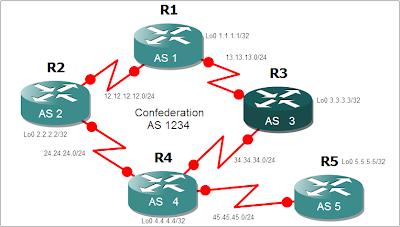
This is feature is used to split an autonomous system into smaller autonomous systems or the reverse which is to combine several autonomous systems into one. Reasons of splitting might be IGP's like OSPF might not be able to handle the routes of a really big enterprise so splitting the AS into smaller will help OSPF scale better, or perhaps the enterprise wants to have separate administrative control per region and wants to control the routing policies on their specific regions. This could also be used if there are company mergers and they want to appear as one AS to other EBGP peers. One thing that intrigues me though is that one of the materials I was using mentioned that this could also be a work around for the BGP Split Horizon Rule. I really doubt that Confederations can be a work around for that. I'll find out for sure in this lab. The diagram below shows 5 Routers with each its own AS number. The goal here to group these routers into one confederation and make them app

EBGP Multihop

Image
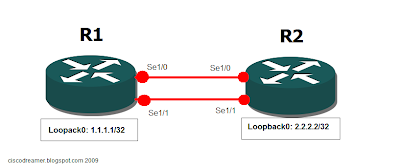
Configuring iBGP doesn't require the neighbor address to be directly connected. The best practice for iBGP is to use the loopback address as the ip address configured on the BGP neighbor statement. Loopback interfaces never go down so provided that there is an alternate route to the loopback ip address through an IGP, BGP session will not be torn down. Using loopback addresses for eBGP is also a good practice if there are multiple links between two routers on different autonomous system as shown on the example diagram below. This will also achieve load balancing. The initial configuration for this lab is shown below. R1# ! interface Serial1/0 ip address 10.10.10.1 255.255.255.0 serial restart-delay 0 end ! interface Serial1/1 ip address 10.10.20.1 255.255.255.0 serial restart-delay 0 end ! interface Loopback0 ip address 1.1.1.1 255.255.255.255 ! router bgp 1 no synchronization bgp log-neighbor-changes neighbor 2.2.2.2 remote-as 2 no auto-summary ! ip route 2.2.2.2 255.255.2

BGP MED

Image
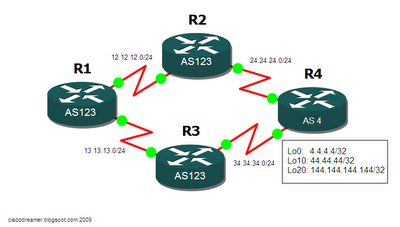
BGP MED is an optional non- transitive attribute meaning its not propagated throughout the whole internet but just to adjacent AS. The word "optional" means that this is not necessarily by default sent with the BGP updates. The purpose of MED is to influence how other autonomous systems enter your AS to reach a certain prefix. If the other attributes are set to default, MED will be the attribute used for path selection however, if Weight or Local preference is configured on the adjacent AS router, then MED will not be selected. The lower the MED the more preferred the path will be. Acronym for Multi Exit Discriminator and otherwise known as "Metric" in the BGP table. The lower the MED the more preferred. It is an optional non-transitive attribute. Can dictate how other AS enter your AS. Configure R4 so that it will advertise a MED value of 30 to R3 and 20 to R2. Afterwards, tweak the route map to set a MED of 10 for network 144.144.144.144/32 in R4 towards R3.

BGP Local Preference

Image
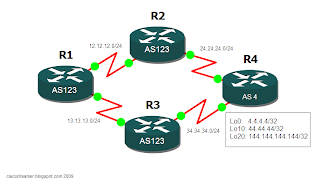
  Local Preference is one of the ways to alter the path taken by one AS to reach another AS. The difference between Local Preference and Weight is that Weight is just locally signifant in the router while Local Preference is what I call "Local AS significant". What I mean by that is that Local Preference is being propagated Intra AS but not outside the AS. Local preference is to influence your own AS how to get or exit to another AS. MED is to influence other AS how to enter your AS. The higher the local preference, the more preferred. In this lab, local preference will be configured and will be using route map for more flexibility. Check the diagram below for details. R1, R2 and R3 belongs to AS 123. R4 is in AS4 and is advertising 4.4.4.4/32, 44.44.44.44/32 and 144.144.144.144/32 subnets.We need to set all routes learned from R3 to have local preference value of 300. After which, configure a route-map that will assign a local preference of 500 in R2 for the network 144.1

Cisco Command Summary

Cisco Router Configuration Commands Requirement Cisco Command Set a console password to cisco Router(config)# line con 0 Router(config-line)# login Router(config-line)# password cisco Set a telnet password Router(config)# line vty 0 4 Router(config-line)# login Router(config-line)# password cisco Stop console timing out Router(config)# line con 0 Router(config-line)# exec-timeout 0 0 Set the enable password to cisco Router(config)# enable password cisco Set the enable secret password to peter. This password overrides the enable password and is encypted within the config file Router(config)# enable secret peter Enable an interface Router(config-if)# no shutdown To disable an interface Router(config-if)# shutdown Set the clock rate for a router with a DCE cable to 64K Router(config-if) clock rate 64000 Set a logical bandwidth assignment of 64K to the serial interface Router(config-if) bandwidth 64 Note that the zeroes are not missing To add an IP address to a interface